Showing posts with label MIKKIMAX. Show all posts

Thursday, June 14, 2018

How to cancel all friend request pending on Facebook?

Login with your details.
Now go to,
https://m.facebook.com/friends/c...
It will display all your pending sent requests.
Open "Inspect" by Right click on the same page.
Now Go to "console" in top tabs and hit below script.
javascript:var inputs = document.getElementsByClassName('_54k8 _56bs _56bt');
 for(var i=0; i<inputs.length;i++) {
 inputs[i].click();
}
That's all, all your requests open on that page will be deleted.
(Note: Just ensure to scroll down till all list gets over, this will delete all open requests on the page)
and then gone…
and use the console

Friday, September 2, 2016

Prevent Duplicate Entries in Excel

This example teaches you how to use data validation to prevent users from entering duplicate values.
1. Select the range A2:A20.
2. On the Data tab, click Data Validation.

3. In the Allow list, click Custom.
4. In the Formula box, enter the formula shown below and click OK.


Explanation: The COUNTIF function takes two arguments. =COUNTIF($A$2:$A$20,A2) counts the number of values in the range A2:A20 that are equal to the value in cell A2. This value may only occur once (=1) since we don't want duplicate entries. Because we selected the range A2:A20 before we clicked on Data Validation, Excel automatically copies the formula to the other cells. Notice how we created an absolute reference ($A$2:$A$20) to fix this reference.
5. To check this, select cell A3 and click Data Validation.


As you can see, this function counts the number of values in the range A2:A20 that are equal to the value in cell A3. Again, this value may only occur once (=1) since we don't want duplicate entries.
6. Enter a duplicate invoice number.
Result. Excel shows an error alert. You've already entered that invoice number.


Monday, May 23, 2016

How to fix Corel Draw save fix (C.A.R.M) ARM Recovery Fix


Corel Draw is one of the most expensive pieces of junk I ever saw. I take that back ðŸ™‚ Considering that still X3 was decent compared to 11 and 12 and also that X5 is pretty good considering Corel’s history and also most important because I’ve seen much more expensive piles of junk since I wrote this.
Nevertheless I, and probably you too have to use and maintain it. I had the following problem on a fresh installation of Windows XP SP3: every time I wanted to export, save as or open a drawing Corel Draw X3 would crash regularly with it’s darned Crash Wizard.I tried applying the patches found on the Corel support page but it didn’t help. After some digging I found that it’s a problem related to theCommon Dialogue function found in comdlg32.
You must launch regedit (ALT+R or START->RUN and type regedit and press enter) and go to:
[HKEY_CURRENT_USERSoftwareMicrosoftWindowsCurrentVersionPoliciescomdlg32]
and change NoFileMru from 0x00000001 to 0x00000000
Windows Registry Editor Version 5.00

[HKEY_CURRENT_USERSoftwareMicrosoftWindowsCurrentVersionPoliciesComDlg32]
"NoFileMru"=dword:00000000
If on your computer it’s already 0 it’s worth trying the other way around, just remember to set it back if it doesn’t help.
UPDATE: I encountered the very same problem with Corel Draw X4 (even after applying the Corel Service Pack for X4) with the ugly difference that the cause of the crash is not reported. Fortunately repeated crashes on open, save, save as and export made me remember this article and sure enough this was the cause.
UPDATE: Users are reporting the same problem of crashing with Corel X5 and Windows XP.
Am I the only one thinking Corel is getting crapier and crapier by the version? Well not really, updating this article now, after some time I feel that x4 is really an improvement over the x3.
UPDATE: Some users reported the same problem on other Windows versions. Also X5 had the same issues.

=============================================================================
i will show you how to fix coreldraw save, save as ,open and import problem 
When you try save coral a.r.m wil run and you cant save your work
this is fix 
1.run regedit (start-run-type regedit)
2.go to [HKEY_CURRENT_USER\Software\Microsoft\Wi­ndows\CurrentVersion\Policies\comdlg32]
3.and change NoFileMru from 0×00000001 to 0×00000000 
thats all save and other options will work now 

Wednesday, May 28, 2014

how to extract images from .docx/.doc Word documents

Lately I've been in a situation where I had an image embedded into a .docx Word document, and I absolutely needed to get the original image file in order to be able to retrieve the original best-quality picture. See the screenshot below? My document contains a picture, it shows up as a small thumbnail, but I need the original high-resolution picture. This tutorial shows the way, it works with Microsoft Word 2007 and above.

There are several ways to retrieve or extract images from a Word document. I am going to be listing the top 3 ways to do so in this article. Feel free to use whichever way you want, but expect different results. Here is the article index here:
  1. Renaming the .docx to .zip, opening the zip file and extracting the images (Best way!)
  2. Copying and pasting the image into a picture processing application (Alright)
  3. Saving the document as a web page and retreiving the generated images (Nice!)
Alternatively you could just use the Snipping Tool from Windows Vista/7, which allows you to save a portion of the screen into an image. Try it, it's pretty much self explanatory, but the final quality of the picture depends on how much you can fit on your screen.

Option #1: renaming the .docx to .zip

This is definitely the best way to retrieve your images. Microsoft Word's .docx documents are actually zip files! Before you ask: what if your document is a .doc, a .html, .odt or any other format? Well just open the document in Word and save it as .docx file, Word will convert it to a zip/docx file for you. So here is my file:

Note: if you do not see the .docx at the end of the file name, you *MUST* follow this tutorial for this to work (this will help you show file extensions in Windows Explorer).

I am going to rename the file to "products.zip" here, note as seen on the screenshot below, the icon changes to something different:


Now, double click your .zip file to open it with whatever program is associated with Zip files on your computer. In my case, Winrar does the job. If the document still opened with Word, you probably did not read carefully enough -- go back to the part where I say to follow this tutorial.

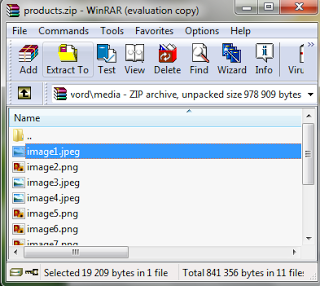
Open the "word" folder as seen in the above screenshot. You should be seeing a "media" folder:

Open it, and you'll now see all the images that appear in your document.

These are the original images that were inserted in the documents, regardless of the size in which they appear when viewing your document. You can extract them to your storage disk by selecting them and dragging&dropping them to the folder of your choice.

Option #2: copying and pasting the image

Another obvious option is to simply select the picture in Word, click Ctrl+C to copy the picture to the clipboard:

If you have and use a design/picture processing tool such as Photoshop, Paint shop pro or something, just open it and paste the picture by pressing Ctrl+V. I don't have anything like this, so I'll just open Paint:

Press Ctrl+V to paste the image into the current canvas in Paint. Unfortunately, the picture is copied in the same size as it appears in Word. If you want a bigger version, you'll have to resize the image in Word first, copy it again, and paste it again in Paint! This is obviously not the best way to go, but it can be easier and faster than the first option I described earlier.

Option #3: saving the document as a Web page

This last option is technically the easiest in my opinion. First, open your document in Word, then save it as a Web page:

When offered to select the format, make sure to choose the "Web page" format... do NOT select "Web page (filtered)", this option will export low-resolution images. The "Web page" option on the other hand exports the original images as well as thumbnails.

Once the file is saved as a Web page, you will find that two new icons appear in your folder:
There's the document itself, but also a folder that Word generated for you. Open the folder to reveal the images (both in original and thumbnail sizes):

You can now copy or save those files to other folders of your computer.

Conclusion

That's it! That wasn't so hard, was it? I still wonder why Microsoft didn't originally include this feature in the Word application itself. In my opinion, we should be able to just right-click an image and see a "Save image as..." option in the menu.

Now, why did I bother writing about this on what is seemingly a sysadmin's/developer's blog, you ask? Because I've been looking this up on the web and most of the answers I found were unsatisfying. It took me ages before I finally stumbled upon a blog article that revealed the docx/zip trick. When I don't (or hardly) find the answer to my questions, I usually whip up a quick article about what I was looking for, and hopefully it ends up helping people.

Saturday, April 19, 2014

How to Activate Airtel Voicemail service for free on your Prepaid Mobile

Airtel provides Free Voicemail service for all prepaid customers but unfortunately no one is aware of it. Even Airtel website or customer care representative is unaware of it.
Activation by Call Code:
  • Call *321*671# for Activation
  • Call *321*673# for Deactivation
Activation by SMS Code:
  • START VMS to 54321 for Activation
  • STOP VMS to 54321 for Deactivation
Voicemail Account Management:
To access your Voicemail Account Management, call Dial 52555 from your registered Airtel Prepaid Mobile. For the very first time, it will prompt you to set a 4 digit passord. Next time you need to enter the password to access your profile settings.
With your account Management, you can do the following things
  1. Change your language presence
  2. Set your Own Custom Voicemail Message
  3. Hear, Save and Delete the received voice mail messages
  4. Change Voice mail box name
You can press the following numbers to perform action on your current running Voicemails
  • Delete – 3
  • Reply – 4
  • Save – 5
  • Previous Voicemail – 6
  • Replay Again – 7
  • Next Voicemail – 8
  • Settings – 9
Settings Page:
  • When you login to setting, Press 2 to change language presence
  • Rename Mailbox Name – 3
  • Change Password – 4
  • Hear or Change current welcome message – 7
  • Remove current Welcome Message – 8

Saturday, April 12, 2014

HOW TO SHOW BLANK CELL RED EXCEL CONDITIONAL FORMATTING


1. Select cells you want to format
2. On Home Ribbon go to Conditional Formatting --> Highlight Cells Rules --> More Rules...
3. In "New Formatting Rule" pop-up select "Format only cells that contain" option from "Select a Rule Type:" section
4. In same pop-up window select "Blanks" options from drop-down-list given under "Edit the Rule Description:" section
5. Again, in same pop-up window click "Format.." button to define type of formatting you wish and click "Ok" to close window